Procedure for 78D176 PC-Boards
After the dynamometer, readout instrumentation and power supply are connected:
- Be sure all equipment is set for the correct power line input voltage as specified on the original order.
- If you are using an alternative option power supply, other than the Model 5200 or 5210, please refer to that manual for operational details. The 5200-2, and 5211-2 are covered in the dynamometer manual – Chapter 5.
- Turn on the readout and power supply, allow a few moments for warm-up – longer if the equipment is below room ambience.
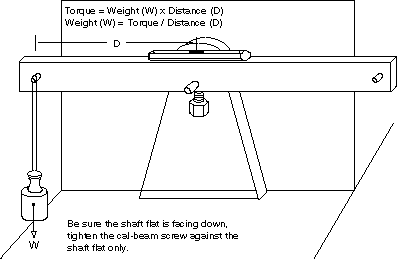
You will need some precision weights to do the following calibration procedure. The pin location precisely fixes the distance on the torque beam, in either metric or English units. Therefore, the force (weight size) you require will be equal to the torque value you want divided by the distance on the beam. Select a weight heavy enough to apply a torque close to the full scale rating.

- Install the Calibration Beam on the dynamometer shaft as shown, only leave the weight off.
- Fashion a loop of light, strong line on the weight. Do not use a wire hook. Hooks will generally apply the force slightly off the centerline of the pin.
- Apply full current to the dynamometer brake by turning the Torque or Current control fully clockwise.
- With the beam exactly horizontal, adjust the ZERO trim pot so that the torque reading is zero +/- 1 least significant digit.
- Hang a calibrated weight of sufficient size from the clockwise pin on the calibration beam (Clockwise position – looking at the front of the dynamometer). The weight times the distance calculation should be equal to, or near, the full scale of the dynamometer.
- Adjust the CW cal trim pot so that the torque reading equals the weight times the distance.
- Transfer the weight to the CCW pin and level the calibration beam.
- Adjust the CCW cal trim pot so that the torque reading equals the weight times the distance.
- Remove the weight from the calibration beam.
- Turn the Torque or Current control counter -clockwise while pumping the calibration beam CW/CCW. This will ensure that there are no residual bumps left on the rotor.
- Remove the calibration beam.
Your dynamometer is calibrated, ready for motor testing.
Magtrol Load Cells are temperature compensated, designed for stability. Therefore this calibration should remain constant indefinitely. However it’s a good idea to re-check calibration, frequently at first, maintaining a record until you have established a history. If there appears to be excessive drift contact Magtrol’s Repair and Calibration Department.
For Calibration Procedures for the 78D055 and 78D160 PC-boards or contact Magtrol Repair and Calibration to discuss a PC-board upgrade.


